Pages

Friday, January 20, 2012

Easiest "Fancy" Salad Ever....

Recognize this?

I'm a rebel! And I'm here to tell you....a lil' rebelliousness can go a long way (ask my mom.) So please....read below....break the rules....

A small change can make a huge difference especially in salad dressings.  In this case, it takes it from boring to fabulous (and you must say that in a high pitched-singing kind of way or the word doesn't have the same affect, you know what I'm talking about, just do it, it's fun.)

Everyone is going to be impressed.

It's definitely not necessary to give away your secret....It is definitely not necessary to tell....definitely, definitely not......(rainman reference)

the reason this is so fabulous....the dressing.....it's, it's.......

bottled! *GASP* *Silence* *crickets*

a foodie "NO-NO"....but like I said, "I'm a rebel!"

Yes, it is the Good Season's Italian dressing carafe....I love it, even though I don't usually follow "the lines," I like them there for reference.

I'm still going to rebel in this recipe and not "follow the directions" but only with the ingredient list...measurements will remain as directed.
 
This recipe came from my mom, Deanna.  She made this salad and we all flipped for it.  It was gone so fast! Now, the pictures I have included are actually missing some ingredients because I threw this together very last minute and just happened to have my camera sitting on the counter (it's usual  place.) So, I snapped a couple photo's thinking I would eventually make the "true" or at least my "jazzed up" version of the salad.  I'm going to post this with the boring photo's, because I'm pretty sure most of you know how to add additional ingredients to a salad without having to see it in a photo---- maybe i'll snap another at a later date with all the ingredients but for now---You'll get the gist.

Dressing:

- 1 packet of Good Seasons Italian dressing mix
- White Balsamic Vinegar - it will be at your grocery store-- you have just never looked for it.
- Light Olive Oil or Light extra virgin olive oil - it's a very neutral, lighter tasting olive oil (I have used regular in a pinch but the "Light" tastes much better)

Mix just like the packet says except use the white balsamic in place of the red wine vinegar and the Light Olive oil in place of whatever the oil the packet states (I think it may be veg oil - yuck~)

Salad:

- Romaine or a mix of greens, being careful if you use delicate greens, use a light hand w/ dressing
- Red Onion
- Pear (red is prettiest), sliced thin
- Pomegranate seeds
- Candied Pecans, you can buy them candied, or you can just use regular and toast them in over (375, 10m when you can smell them they are done) or you can candy them yourself but it's a pain and I don't do it.
- Goat Cheese, crumbled (you can use a variety of cheeses here but creamier, crumbly work best...ex. feta, gorgonzola/blue, etc...)
- whatever else you want to add...I like cucumbers so I add those but the "sky is the limit"

MIX AND EAT!!!!!!!!!!

Missing cheese and pecans...but still scrumptious!

Thursday, January 19, 2012

Homemade Whole Wheat Pop Tarts


H, my son, has become addicted to pancakes.....He used to be addicted to eggs.....Over easy eggs to be exact, but now, pancakes!  I am SICK OF MAKING PANCAKES!  I'm sick of making a lot of them and freezing them, I'm sick of running out of them and making another batch.  I am happy to be out of the egg stage though......making an egg, to have him not touch it, then it solidifies into this amazing adherent mess on the plate....Ugh, EGGS!

So, I had a thought, what did I like to eat when I was a kid....Toaster Strudels!  Not really pop tarts, but the flakier ones, with the frosting that you put on yourself....the one that my dad would make for me every morning, and the one, where he taught me the best way to warm up the plastic packet of frosting (gross) was to hold it between the palm of your hands rather than microwaving so it had the perfect "spreading consistency" (really gross) Ohhhhhh, those were GOOD!!! Love the days before we knew about all the weird crap in our food.

I made a homemade poptart....I made the whole wheat pie crust a day in advance and kept it in the fridge (freezing the rest.)  I made the filling all healthy yet yummy of different berries (frozen but fab.) I was thinking, this kid is going to LOVE ME! He is going to think, holy moly, dessert for breakfast...YES!

He wouldn't touch it! I was in the giving mood, I offered it to my husband. Again, wouldn't eat it, stating "I'm not eating all that sugar!" (don't know who he was trying to kid...) I replied, "it's healthy," reply, "maybe later"...

WHAT, no takers on a warm, just out of the oven, berry poptart with a sprinkling of sugar on top??????

i ate it.

it was wonderful.

i want another one right now.

i'm fat.

not really, it's healthy.

Whole Wheat PopTarts 
pie crust adapted from "Cheeky Kitchen", filling made up by me...

CRUST:
1 C whole wheat
1/2 C white flour
2 t sugar
1/2 t salt
½ c. cold butter, sliced (keep butter in fridge until adding- you want it COLD)
5-7 Tbsp. cold milk

Put flour, sugar and salt in food processor. Pulse to mix.  Add butter, pulse until it looks crumbly, like peas but smaller--- then add milk, maybe 3 Tablespoons at first and then pulse, and then run for a couple seconds, if you can tell that it isn't going to come together into a ball, add another tablespoon or 2 (use your best judgment) pulse, and then leave on for a couple second (it took 6 tablespoons for me). It will eventually all firm up in one side of your processor.  Dump out onto a flour surface and just maneuver it enough to get it into a ball and place in fridge until ready.


FILLING:

You could fill these with anything---you could cut up apple...put it on the stove with a lil' water, cinnamon, vanilla, allspice, nutmeg, tad bit a sugar...cook until it's just falling apart. You could use all jelly/jam, chocolate, Nutella, peanut butter, anything... I used frozen berries and a bit of "just fruit" jelly because it is what I had.

1 c. frozen mixed berries, still frozen
3-4 T jelly- I used blackberry "all fruit" but whatever you have will work
water

Put fruit in small sauce pan and warm up until thawed and starting to become liquid.  Smoosh the fruit with a fork or spoon to help it thicken a bit. If it's too thick add water (tablespoon at a time.)  Add your jelly and stir.  If your mixture is "too loose," let it cool a bit before deciding your next step.  It will not be to a boiling point when inside the poptart, just  "appropriately hot" so it will firm up a bit....if you still think it is all too liquid you can add a touch of cornstarch to your mixture.

Cool filling and add a couple tablespoons to your poptarts!!!

WHAT TO DO:

I pulled my ball out (hahaha-dirty) and split it into 4 hunks, 1 hunk makes one poptart.  roll it into long oval and fold over or cut into rectangles if your a perfectionist (or wanting to take a photo) add filling, leaving an edge.  Using a fork, seal edges....poke a couple holes to let steam out.  I used, whole milk because it was all I had but if you had cream it would work better....brush some milk over the top, sprinkle with a lil' sugar....(you can skip the sugar but my filling had very little sugar so I wanted some sweetness to hit the tongue first)

Bake at 400 degrees, for 10-12 minutes....all depends on your oven, watch for your edges to brown.  Remember this is whole wheat dough, it's not going to be as pretty as regular...it's not going to be as golden or as flaky but I tell ya, it's pretty damn good for being better for you!

Chow down!!

Saturday, January 14, 2012

Garlic Chicken with Israeli CousCous "Casserole"


Hello All....I've been tardy in posting this because I'm trying to figure out how to add a tab at the end of my posts with the "printer friendly" version of my recipes but it is not as easy as I anticipated.  There are a few different ways of doing it so I'm in "research" mode....So, again, apologies!!


My mom made this recipe and I had some warmed up as leftovers and fell in love. It is very tasty and it's a CASSEROLE! I never like casseroles, so when I do stumble upon a good one, it tends to be a keeper.  This is going to seem like a lengthy meal and does have a few steps.  My suggestion is start it a day or two in advance or early in the day.  The chicken benefits from longer marinating time and you won't feel so bogged down by multiple steps.

A couple of notes before you start....be sure to have a LARGE saute pan to brown chicken or do it in batches.  My couscous is a lil' darker in color then it should be and this is because my chicken started to burn before it was sufficiently brown, therefore making my pan sauce darker. This will also allow your chicken to cook a bit longer in your pan and the cook time will not have to vary.

I did not take a million photo's with this dish...more because I was rushing through some of it and then I lost light....so maybe at a later date when I make again, i will update post with more photos....

Garlic Chicken with Israeli CousCous Casserole
Adapted from Anne Burrell on Food Network.

Chicken:

2 whole garlic bulbs
1 lemon, zested and juiced
1 large bunch thyme, leaves only
1 tablespoon cumin
Pinch crushed red pepper flakes
Kosher salt
Extra-virgin olive oil
1 (4 to 5-pound) chicken, cut into 8 to 10 parts

CousCous:

Kosher salt
2 cups medium-size Israeli couscous
Extra-virgin olive oil
1 large onion, sliced
3 ribs celery, sliced thin
Pinch crushed red pepper flakes
1 1/2 cups dry white wine
3 tablespoons tomato paste
Large pinch saffron
2 zucchini, cut into 1/2-inch dice
2 to 3 cups chicken stock
1/2 cup pine nuts, toasted
3 scallions, white and green, sliced thinly on the bias

Directions

Chicken:
Preheat the oven to 375 degrees F. Wrap Garlic in tin foil and  roast them until they are soft when squeezed, about 30 minutes. Remove them from the oven and let cool.

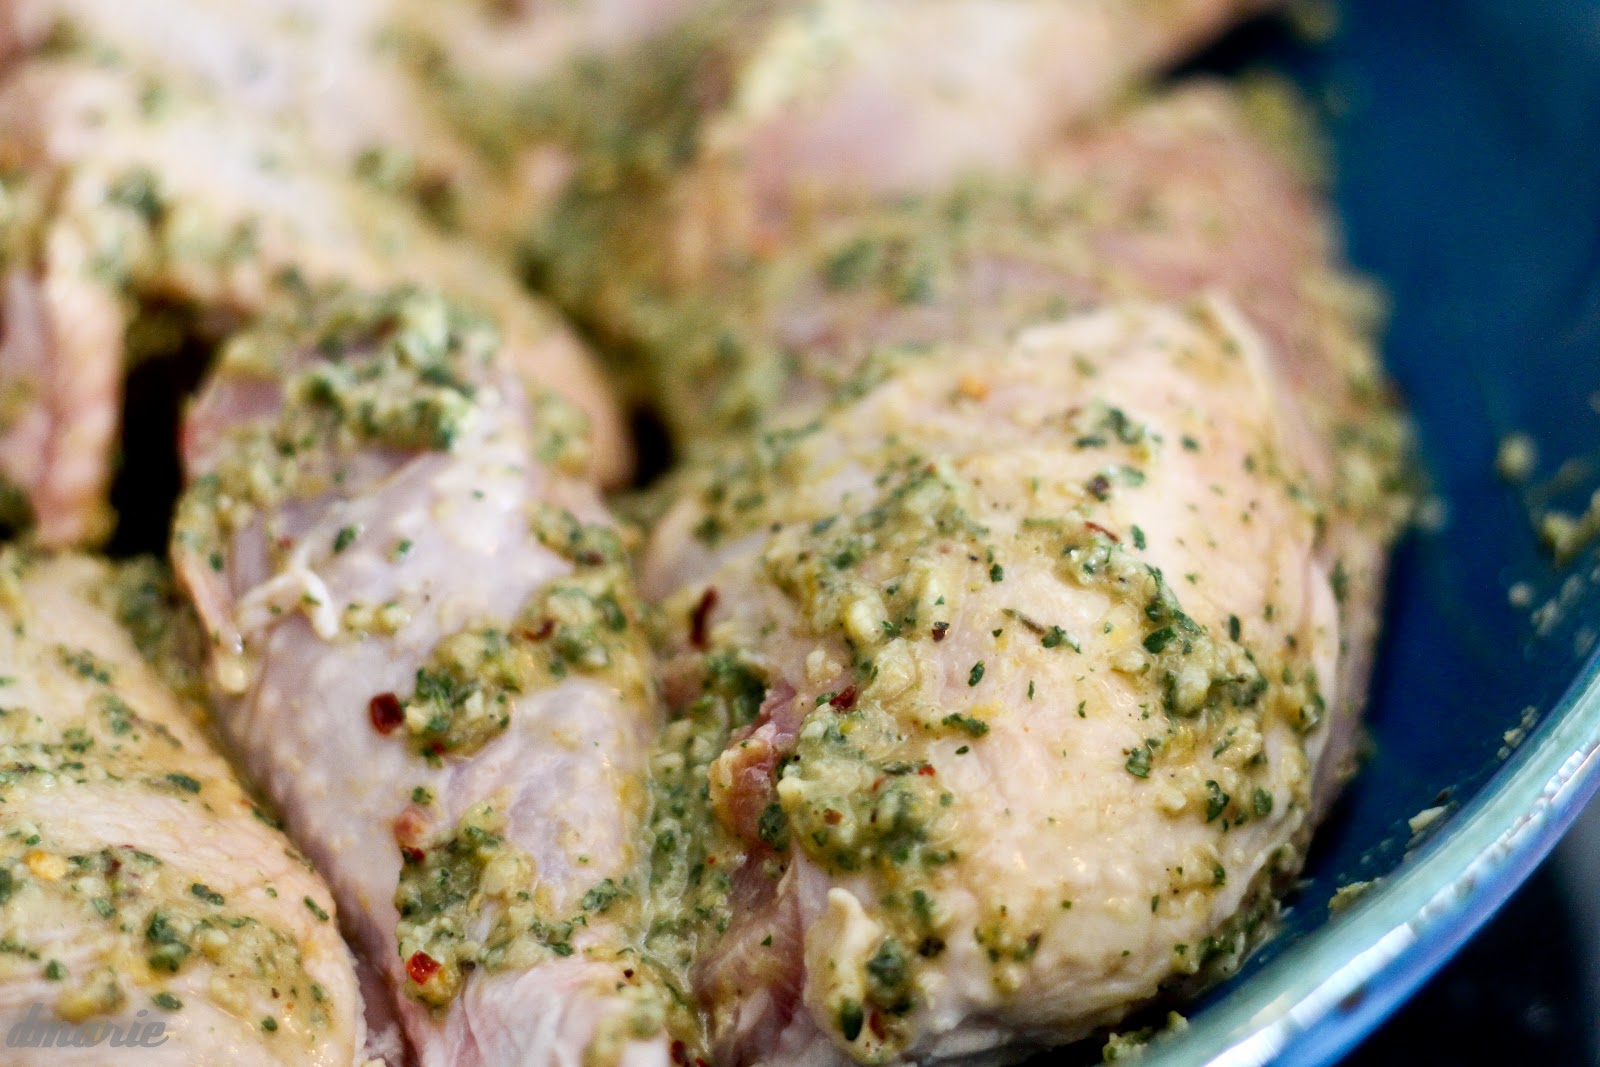
When the garlic bulbs are cool, slice the tops off and squeeze out the roasted garlic. Add the garlic to a food processor or a bowl, along with the lemon zest, lemon juice, thyme, cumin, crushed red pepper and salt, to taste. Add a little olive oil and puree or mash into a loose paste. Massage the mixture all over the chicken pieces and let sit for at least 1 hour.

Couscous:
Bring a pot of well salted water to a boil, over medium heat. Add the couscous and cook it until it's about 2/3 of the way cooked, about 5 to 6 minutes. Drain and reserve.
Trader Joe's "mixed couscous"
 
Coat a large saute pan with olive oil over medium-high heat. Add the chicken to the pan and brown it on all sides. Remove it to a plate, drain the fat and add the onions and celery. Season with salt, to taste, and the crushed red pepper. Deglaze with white wine, scraping up all the crud on the bottom of the pan and cook the onions and celery for 7 to 8 minutes. Stir in the tomato paste and cook for another 2 minutes. Add in the saffron, zucchini, cooked couscous, and chicken stock. Stir to combine, then taste and adjust seasoning, if needed. Transfer the mix to an ovenproof dish. Nestle the chicken, skin side up, in the couscous and cover with foil. Add some more chicken stock to keep everything nice and moist. Sprinkle with pine nuts and cover with foil. Place the baking dish on a sheet pan.
Roast the chicken for 20 minutes, covered, then remove the foil and roast for another 10 to 15 minutes.(My chicken required longer cooking because of my "browning situation")
Remove the chicken from the oven CHECK TEMP OF CHICKEN and top with scallions before serving.

Enjoy!


Monday, November 21, 2011

Monday Morning Nonsense....

I didn't have a food post today but I had a couple funny pics of H.  These may help those of us in the D remember what summertime looked like...(considering it is, once again, cold and rainy today.....)


Thursday, November 17, 2011

Banana Muffins - For those left over brown bananas on your counter or freezer.


H goes through stages where he will eat 2 banana's a day and then for the next week or two, will not touch them.  So, we tend to have a few left over bananas, almost going to waste, that get thrown in the freezer.  Yesterday, I opened the freezer door and an avalanche of frozen banana's almost broke my foot.  Therefore, banana muffin's were required......


I have adapted this recipe from a few different ones that I have seen/used via All Recipes website.  I use a combination of whole wheat and AP flour and applesauce instead of butter/oil to make them a tad more healthy.  I also cut the sugar down which I am going to continue to try to do so until I get a batch that tastes bad and then I'll repost to let you know the least amt needed (for those of you with little ones...)  This recipe can be made with entirely AP (all purpose) flour as well as 1/3 c butter/oil (butter melted) instead of the applesauce.

Enjoy!

Banana Muffins


3/4 c AP flour
3/4 c Whole Wheat Flour
1 t baking powder
1 t baking soda
1/2 t salt
 1-1.5 t cinnamon
3 banana's, mashed
1/2 c sugar
1 egg
1/2 c applesauce
1 t vanilla
Cooking Spray for muffin pan


Preheat oven to 350 degrees.

In medium bowl, mix flours, baking powder, baking soda, salt and cinnamon.  Use a whisk to be sure to get the dry ingredients well blended (or you can use a sifter but I don't own one.)  In a larger bowl, mash bananas.  Add sugar, egg, applesauce and vanilla to bananas and mix well.  Stir in your dry ingredients being sure NOT TO OVER MIX....just stir until you don't see any more flour streaks and then STOP.  Over mixing muffin mix makes dense rock hard muffins, which are yucky!


Spray muffin pan, I use mini muffin pan's because H likes them that size for his lil' hands...and so he can shove the whole thing in there and proceed to run around and give me a heart attack (see photo below.)
such a sloppy baker...


Fill to top and bake for 10-13 minutes...poke with toothpick and your ready to go...Careful these babies are HOT HOT HOT.....


Sunday, November 13, 2011

Bar Stool Redo


Latest Project....Bar Stool Redo


So I actually forgot to take original photos of these bar stools.  They were originally this really horrible greenish blue (the legs.)   I got them for $5.00 a piece at the Salvation Army so I figured for that price they were easily fixable.  The white vinyl seats were in pretty good shape, all they needed was a quick spray of black spray paint and we were good to go....They have sat like this in our kitchen for over a year.  Then the other day while going through my stash of fabric, I ran into this IKEA pattern that I purchased in like 07' for a different project that never came to fruition.  I was hunting through the house for something to do with it since I didn't have much.  This is the end result....They are a little loud but I figure I will like them for a bit and then Hudson will spill something on them that I can't possible get out and then I'll start all over again....


Saturday, November 12, 2011

Addicted to Pot Roast Taco's.....


Apologies for the "yellowish" pictures.  We were cooking at night with zero natural light.

My friend Deanna and I love to cook together.  She is addicted to yummy foodilicious recipes like me.  We are especially fond of the recipes most people shy away from due to a million steps or ingredients.  This recipe is NOT one of those.  This is closer to a "throw it in a pot and ignore it for a couple hours" sort of recipe and let me tell you....You will not be cooking again for a couple days because the left overs are better and better the longer they sit in the fridge (if you don't eat it all in one sitting!)

The recipe is an adaptation of Tyler Florence's Mexican Pot Roast Taco's or his Rock-n-Roll Taco's...pending on where you are looking.  The one thing we did notice is all of the recipes (based on where you are looking) are slightly different.  They all have one thing "wrong."  He never mentions reducing the sauciness after simmering...If you did not do this, you would be serving soup.  So, our adaptation begins....

Pot Roast Taco's
Adapted from Tyler Florence's Mexican Pot Roast Taco's because everywhere you look there is different ingredient measurements.

2 pounds beef shoulder or chuck roast (we used Chuck roast because it was all they had)
Salt/Pepper
Evoo
2 garlic cloves, smashed
1 large onion, sliced (not too thin)
1 (28-ounce) can whole tomatoes- we used diced tomatoes (recommended: San Marzano)
1 tablespoon ancho chile powder
1 T cayenne (we used 1 teaspoon of red pepper flakes but it definitely needed more)
1 T ground cumin
1 bunch of cilantro, divided in half.
water
2 T red wine vinegar

Salt and Pepper both sides of your roast/shoulder.  Heat 2-3 T of EVOO in the bottom of a heavy pot or dutch oven until shimmering.  Add roast/shoulder browning all sides well.  Add onion and scoot meat around so that it picks up some of the color (aka caramelizes.)  Add garlic and do the same (be careful not to burn garlic- it will get very bitter in flavor.)

Add can of tomatoes (with all juice), cayenne, cumin and cilantro. Do your best to stir it up a bit.  Add water to the pot, just enough to cover the roast.  Bring to a boil.  Cover with lid and turn heat down to low (or whatever your stove needs to be on to maintain a simmer) and simmer for 2 - 2.5 hours until meat falls apart when poked with a fork.
Add enough water to just cover roast
Reduced for approx. 30-40 min
Once meat is at the falling apart stage. Remove cover, add 2 T of vinegar and turn heat up to a slight boil to reduce the sauce.  This will also allow time for the meat to flake apart so you do not need to remove it and pull apart separately.   This will take approx. 30 min- 45 min (time depends on a lot of factors, heaviness of pan, how much water originally put in, how close to 2 lbs your roast actually is, whether your cover fit properly or if some water was able to cook off during roasting, etc....) Once it looks thick and yummy enough to put into a taco shell...DO SO IMMEDIATELY!! hahaha this is SO good! Add your favorite taco toppings and Enjoy.


Guinness Braised Sausage with Apples, Pears and Cranberries....

So, I do not have any pictures of this recipe because it was a last minute throw it in a pot recipe that I wasn't expecting to like...I had purchased a bag of fresh cranberries and I wanted to use them before they went bad.  I did my tried and true way of finding a good recipe.  I went to foodgawker.com and typed in the search engine, "Cranberries."  Then I look for the picture that makes my taste buds tickle...*dork*

This was VERY GOOD! I had my brother E over, he and Jason gobbled it up and asked for more before I could even take a bite.  J even stated this morning, "I don't know what that stuff was last night, but it was awesome!"  I rarely get this sort of reaction from him so if you have a man in your life whom you want to make a "healthy man meal" for, I suggest this recipe.

I used Medium spicy chicken sausage and Guinness for the beer.  I only used one apple and one pear but everything else the same...Link below....(Don't you just love the name of her blog!! Bitchin' Camero!)


 http://www.bitchincamero.com/2008/11/stout-braised-sausages-with-apples-pears-cranberries/

Enjoy! 


Tuesday, August 30, 2011

Savory Chicken Crescents...


I know, I know, the Volcano Cake's were supposed to be the first "blog back" however I'm feeling a lil' PLUMP from the honeymoon...SO, instead I'm skipping the deeeessertttt for now and going with something scrumptious.  This is a recipe my mother has made for a million years and it is from our family cookbook printed when I was young. So, enjoy...FYI---KIDS LOVE THIS SHIT!!! (Sorry for swearing, but it's true!!)


Chicken Crescents 
Original recipe from Kathy Conaway from the "Family Cookbook"
Makes 4 crescents or sammiches....

3 oz. Cream Cheese, softened
3 T. butter or margarine, softened
2 cups cooked chicken, cubed or "pulled"
1/4 t. salt
1/8 t. pepper
2 T. Milk
1-2 T. Chives or Green Onion, chopped*
1 T. Pimento, chopped (Optional, I did not have so I did not use)
8 oz. can of Pillsbury crescent rolls
3/4 cup seasoned croutons, crushed (or potato chips, which were awesome by the way...)

Preheat oven to 350 degrees.  In medium bowl blend cream cheese, chives and 2 T. of melted butter (pour the butter over the cream cheese, it will warm it up a bit and help it incorporate) until smooth.


Add the s/p, milk and chicken, mix well.  

Separate crescents into 4 rectangles, firmly press perforations to seal.  


Spoon approx. 1/5 cup of meat mixture onto the center of each rectangle.  

Pull the four corners of the dough to top center; twist slightly and smoodge the seams together (aka, press to seal.)  Brush the tops with remaining melted butter and sprinkle with croutons or if you live in my family, potato chips because my husband and son are crouton snackers...I go to make a salad, and poof, gone....
Thief!!

the chips were bomb though! Fabulous substitution.

Bake on ungreased cookie sheet for 20-25 minutes until golden brown. 

Makes 4 sammiches...

Friday, January 7, 2011

A Tasty Finger Food - Goat Cheese and Olive Muffins


I am always looking for good "finger-friendly" appetizers for parties and gatherings.  I found this recipe on another food blog (which you can find here.)  This blogger served them full sized and over mixed greens.  The idea of a savory muffin intrigued me and I thought it would be a fantastic idea in a miniature size.  So out came my mini muffin tins and away I went.  I did make a couple changes to the recipe and did not originally serve over greens.  I do think they needed a lil' something....a lil' something in the form of drizzled olive oil/truffle oil perhaps or possibly the original bloggers idea and over a small amount of dressed mixed/micro greens.

The recipe found here is by weight.  I used an online conversion chart to make the changes but really they are estimates so feel free to adjust how you see fit.  I was considering using a little more milk next time.

Goat Cheese and Olive Muffins
Recipe adapted from Angie's Recipes


1 cup AP Flour
1 t baking powder
1/2 cup milk (i used whole because that is what i had on hand)
1/3 cup EVOO
2 eggs, yolks and whites seperated
2 oz. Green Olives (I used the small ones and left these whole)
2 oz. Black Olives (I used canned and sliced)
1/2 cup grated Parmesan
2 T fresh parsley, chopped
2 T fresh rosemary, chopped (I used less because I'm not a huge fan)
Small log of goat cheese

Preheat Oven to 350 degrees.

Whisk together (to eliminate chunks) flour and baking powder.  Add milk, EVOO and egg yolks and beat until smooth. I used my stand mixer for all of this but it isn't overly thick so it could easily be done by hand.

Add in Parmesan, olives, chopped herbs and some salt/pepper. Go easy on the salt...Olives are VERY salty by themselves.  This mixture is going to seem overly thick and not at all muffin like, but we aren't finished!! :)

In a seperate bowl, beat egg whites until stiff.  Keep in mind this needs to be fluffy so don't beat them to death, just until they don't fall off whisk when you turn upside down.

Fold the egg whites into the olive batter.  Again, we want these to remain fluffy so be sure to fold and not stir.  We need the air to stay in the batter.

Fill the mini tins 3/4 or just until the top, simply being sure to not over fill.  Top each one with a small piece of goat cheese and drizzle with olive oil.  I drizzled mine with truffle oil and it was fantastic so if you have it or love it, use it!!

Bake for 12-15 minutes until golden brown.  My where cooked through but not as golden on the top as I wanted so I flipped oven to broil and moved up the rack.  I left the oven door half open to release some heat so they wouldn't be cooking at full temp and browned the top slightly.

They were yummy, but as I said before, I served just like this and next time I will drizzle with oil again right before serving and/or serve on a platter of greens being sure to let guests know it is meant to eat with a small amt of greenery.